
Calisthenics Progression: From Push-Ups to Planche in 6 Months
Getting to a planche is a tough but fulfilling goal for fitness lovers. It needs a solid calisthenics progression to build strength, control, and patience. Start with simple bodyweight exercises like push-ups and move up to harder movements.
To reach a planche in 6 months, you must have a clear plan and stick to it. Learn about progressive overload and follow a workout plan that gets harder as you go.
Key Takeaways
- Start with basic bodyweight exercises like push-ups.
- Gradually progress to more complex calisthenics movements.
- Understand the principles of progressive overload.
- Implement a well-planned workout routine.
- Consistency is key to achieving a planche in 6 months.
The Challenge of Mastering the Planche
Learning the planche is a tough but rewarding path. It needs a deep grasp of its biomechanics. The planche is a high-level calisthenics move that asks for lots of strength, control, and technique.
Biomechanics of the Planche Position
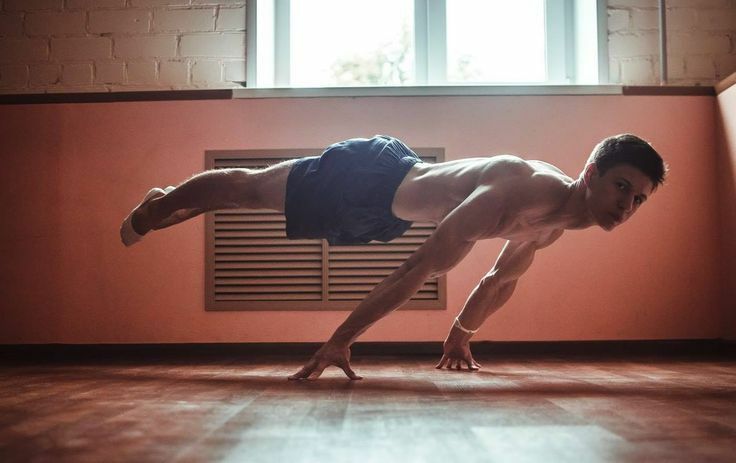
The planche is about holding a flat position with your body, supported by your hands. This needs exceptional strength in your shoulders, wrists, and core. The muscles work together to keep your body in the right spot.
"The planche is a true test of strength, control, and body awareness," say calisthenics experts. It's about balancing different muscles to hold the position.
Setting Realistic Expectations for Your Journey
Knowing the biomechanics is just the start. Setting realistic goals is key for your growth. Getting the planche in six months is a big goal that needs regular training and hard work. It's important to break your journey into smaller, easier steps.
- Check your current strength and flexibility.
- Make a training plan that fits you.
- Keep track of your progress and change your training if needed.
By setting realistic expectations and sticking to your training, you can improve slowly towards mastering the planche. Remember, the journey is as valuable as the goal.
Prerequisites Before Starting Your Training
To master a planche in six months, you must meet certain prerequisites. Knowing these requirements helps you prepare well and avoid injuries.
Physical Strength Requirements
Having enough physical strength is key for planche training. You need strong shoulders, back, and core. Here are some important strength signs:
- Can do multiple sets of push-ups correctly
- Has strong scapular stabilizers for support
- Has strong core for a straight body line
Necessary Mobility and Flexibility
Mobility and flexibility are as vital as strength for planche training. You need to be able to move your wrists well and have flexible shoulders and hips for the right planche position.
- Do wrist mobility exercises to increase flexibility
- Stretch your shoulders to improve range of motion
- Stretch your hip flexors to get into a deeper planche
Mental Preparation for Long-Term Commitment
Mental preparation is often missed but is key for mastering the planche. You must be committed and patient, knowing progress takes time and effort.
To mentally prepare, try these strategies:
- Set achievable goals and milestones
- Keep track of your progress to stay motivated
- Make a routine that includes training and rest
Essential Equipment and Training Environment
https://www.youtube.com/watch?v=LSWwofk03_8
Setting up your training space is key to improving your planche. While planches are bodyweight exercises, the right gear and setting can boost your training. It also makes it safer.
Minimal Setup Requirements
You don't need much to start planche training. Here's what you need:
- A sturdy floor or parallettes for planche holds and exercises.
- A safe space to train without injury risks.
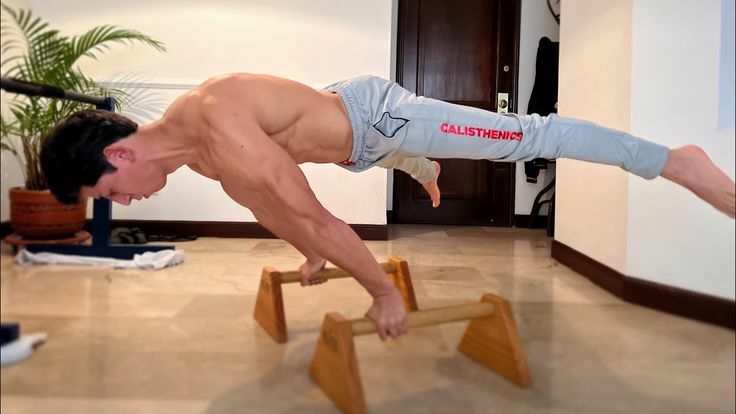
Parallettes are great because they let you lift your hands. This increases your range and eases wrist strain. If you can't get parallettes, a solid floor works for the start.
Optional Tools to Accelerate Progress
Some tools can help you get better and support your training:
| Tool | Benefit |
|---|---|
| Resistance Bands | Helps with planche training by adding support and building strength. |
| Pull-Up Bar | Boosts upper body strength, vital for planche. |
| Gymnastics Rings | Strengthens and stabilizes, engaging more muscles. |
Adding these tools to your routine can help you get past training hurdles. It speeds up your planche progress.
"The right equipment can make a big difference in your training. It's not just about having tools, but using them right to improve strength and technique."
Knowing what equipment you need and setting up a good training area helps you reach your planche goals faster.
Assessing Your Starting Capabilities
To tailor your training effectively, you need to evaluate your current push-up strength, wrist mobility, and core strength. This initial assessment will help you identify areas that require improvement. It will also help you create a personalized training plan.
Push-Up Strength Assessment
Start by assessing your push-up strength. Try to do as many push-ups as you can with proper form. This will give you a baseline for your upper body strength.
Note the number of repetitions you can complete. Also, pay attention to any difficulties you encounter. This could be struggling to maintain proper form or feeling strain in your shoulders or wrists.
Example Push-Up Strength Assessment Table:
| Repetitions | Form Quality | Difficulty |
|---|---|---|
| 10 | Good | Moderate |
| 15 | Fair | Easy |
| 5 | Poor | Hard |
Wrist and Shoulder Mobility Testing
Wrist and shoulder mobility are critical for achieving the planche position. Perform the following tests to assess your mobility:
- Wrist Extension Test: Hold your arm straight out in front of you and lift your hand up as far as you can. Compare the range of motion to the other side.
- Shoulder Flexibility Test: Reach overhead and then back down to your sides, noting any discomfort or limited range of motion.
Core Strength Evaluation
Core strength is essential for maintaining the planche position. Evaluate your core strength by performing a plank hold. Hold the plank position for as long as you can, maintaining proper form.
Note the duration and any difficulties. This could include sagging hips or lower back strain.
Core Strength Evaluation Criteria:
| Hold Duration (seconds) | Form Quality | Core Strength Level |
|---|---|---|
| 30-60 | Good | Moderate |
| 60-90 | Good | Strong |
| <30 | Poor | Needs Improvement |
Month 1: Building Your Foundation
The first month is all about building a strong base. You'll work on exercises that boost your strength, stability, and flexibility.
Push-Up Variations to Master
Mastering push-ups is key to getting better at the planche. Start with:
- Standard push-ups to build overall chest and shoulder strength.
- Diamond push-ups to target the triceps.
- Decline push-ups to increase the difficulty and engage the upper chest.
Tip: Focus on proper form and controlled movements.
Supplementary Exercises for Shoulder Stability
Shoulder stability is essential for the planche. Add these exercises to your routine:
- Wall slides to improve scapular mobility.
- Scapular push-ups to strengthen the muscles around your shoulder blades.
- Hold-planks to enhance overall shoulder stability.
Remember: Consistency is key to developing stable shoulders.
Wrist Conditioning Protocols
Wrist strength and flexibility are vital for the planche. Try:
- Wrist extensions with light weights.
- Wrist curls to strengthen the forearm muscles.
- Wrist circles for improved flexibility.
By focusing on these areas, you'll be well on your way to building a strong foundation for your planche journey.
Month 2: Developing Planche-Specific Strength

In the second month, you'll focus on building planche-specific strength. This is key for moving on to more challenging movements. You'll do exercises that help you get stronger and more in control.
Introduction to Planche Leans
Planche leans are essential for getting strong enough for a full planche. Start in a push-up position with your hands shoulder-width apart. Lean forward, keeping your body straight, until you feel your shoulders and chest working hard. Hold for a few seconds before going back to the start.
Tips for Planche Leans:
- Keep your core engaged to maintain a straight body line.
- Focus on slow, controlled movements.
- Start with a shorter lean and gradually increase the distance as you build strength.
Pseudo Planche Push-Ups Progression
Pseudo planche push-ups target the muscles used in a planche. This exercise is like a push-up but with your body in a planche-like position. Your shoulders should be protracted and your body straight.
| Exercise Variation | Description | Repetitions |
|---|---|---|
| Pseudo Planche Push-Up | Push-up with protracted shoulders | 3 sets of 8-12 reps |
| Incline Pseudo Planche Push-Up | Push-up on an incline surface | 3 sets of 10-15 reps |
| Diamond Pseudo Planche Push-Up | Push-up with hands close together | 3 sets of 8-12 reps |
Supplementary Hollow Body Training
Hollow body training is vital for building core strength. Lie on your back with arms extended overhead and legs straight. Lift your arms, shoulders, and legs off the ground, holding a slight "hollow" position. Hold for as long as you can with proper form.
"The key to a successful planche is not just the strength in your arms and shoulders, but also the control and strength in your core." - Calisthenics Expert
By adding these exercises to your routine, you'll be on the path to mastering planche-specific strength.
Month 3: Mastering the Tuck Position
As you start Month 3, focus on mastering the tuck planche position. This is a key step towards the full planche. It needs strength, technique, and control.
You've built a strong foundation of strength and mobility. Now, apply these skills to more advanced exercises. The tuck planche hold is the main focus for this month.
Tuck Planche Hold Technique
To master the tuck planche hold, engage your whole body. Start by practicing against a wall or with a partner. Keep your body tight, with knees tucked and hands shoulder-width apart.
A proper tuck planche hold involves:
- Engaging your scapula to support your body weight
- Keeping your core tight to maintain control
- Positioning your legs in a tucked position to reduce the lever
Tuck Planche Push-Ups Development
Tuck planche push-ups are a step up from basic push-ups. They work your chest, shoulders, and triceps. Your core also gets a workout.
To get better at tuck planche push-ups, start with help like resistance bands or a partner. As you get stronger, reduce the help.
| Exercise | Sets | Reps |
|---|---|---|
| Tuck Planche Push-Ups | 3 | 8-12 |
| Assisted Tuck Planche Push-Ups | 3 | 10-15 |
Scapular Strength Exercises
Scapular strength is key for control and stability in the tuck planche. Scapular push-ups and dips will strengthen your shoulder blades.
"Scapular strength is often overlooked, but it's essential for advanced calisthenics movements like the planche." - Calisthenics Coach
Add scapular exercises to your routine to boost your performance.
Month 4: Advancing to Advanced Tuck
Now you're in Month 4 of your calisthenics journey. It's time to move up to the advanced tuck position in planche training. You should have a good base in the tuck planche by now. Now, it's time to improve your technique even more.
Advanced Tuck Planche Technique
To improve your tuck planche, focus on tightening your core. Keep a straight line from head to heels. Engage your lats and depress your scapula to support your body. Practice holding the advanced tuck planche for longer to build endurance.
Overcoming Common Plateaus
Plateaus are a normal part of any training journey. To get past them, analyze your current training routine and find ways to improve. Try making your exercises harder or adding new ones to challenge your muscles.
| Plateau Cause | Solution |
|---|---|
| Lack of Progressive Overload | Increase exercise difficulty or add variations |
| Insufficient Recovery | Ensure adequate rest and nutrition |
| Poor Technique | Focus on proper form and engage core muscles |
Supplementary Back Lever Training
Adding back lever training can really help your planche progress. Start with assisted back levers and then move to harder ones. This will boost your strength and control.
- Begin with assisted back levers using resistance bands.
- Progress to negative back levers by slowly lowering yourself to the ground.
- Eventually, aim to hold a full back lever for several seconds.
Month 5: Straddle Planche Preparation
As you enter the fifth month of your calisthenics journey, it's time to focus on straddle planche preparation. You've built a solid foundation of strength and technique. Now, you're ready to progress towards more advanced skills.
The straddle planche is a critical milestone in your planche progression. It requires strength, flexibility, and control. To achieve this, you'll need to work on specific exercises and mobility drills.
One-Leg Extensions from Tuck
One of the key exercises to master during this phase is one-leg extensions from the tuck position. This exercise helps in developing the necessary strength and control to transition into the straddle planche.
- Start by holding a tuck planche position.
- Slowly extend one leg outwards, keeping the other leg tucked.
- Hold this position for a few seconds before returning to the tuck position.
- Alternate legs to ensure balanced development.
Tip: Focus on maintaining a tight core and controlled movement to get the most out of this exercise.
Straddle Planche Progressions
Progressing to the straddle planche involves a series of incremental steps. It's essential to be patient and not rush through these progressions.
- Begin with assisted straddle planche holds using a resistance band or a partner.
- Gradually increase the duration of your holds as you build strength.
- Progress to unassisted straddle planche holds, focusing on maintaining proper form.
Remember, consistency is key. Regular practice will help you achieve the straddle planche more effectively.
Hip Flexor and Hamstring Mobility Work
Mobility in your hip flexors and hamstrings is critical for achieving a proper straddle planche. Incorporate specific mobility exercises into your routine.
- Perform dynamic stretches such as leg swings and lunges to improve hip flexor mobility.
- Incorporate hamstring stretches, such as seated or standing hamstring stretches, to enhance flexibility.
By focusing on these areas and maintaining a consistent training regimen, you'll be well on your way to mastering the straddle planche by the end of month five.
Month 6: Achieving Your First Full Planche
As you enter the final month, achieving your first full planche is close. You've worked hard to build strength and technique. Now, it's time to put it all together.
Final Strength Preparations
To master the full planche, focus on your shoulders, wrists, and core strength. Keep practicing planche leans and pseudo planche push-ups to get stronger.
Don't forget to work on scapular strength and wrist stability. Scapular pull-ups and wrist conditioning will help improve your planche.
Technique Refinements for Success
Technique is key for the full planche. Keep your body straight, engage your core, and lower your shoulders.
Wrist pain is common. Make sure your wrists are conditioned and use the right technique. Focus on hand placement and even weight distribution.
Mental Strategies for Breaking Through
The mental game is as important as the physical. Build a positive mindset by setting goals and rewarding yourself.
Visualization helps too. Imagine yourself successfully holding the full planche. Remember,
"The mind is the limit. As long as you believe you can, you can."
This mindset will help you overcome tough moments and stay focused.
With physical and mental preparation, you're ready for your first full planche. Stay committed, and you'll soon celebrate your success.
Calisthenics Progression: From Push-Ups to Planche in 6 Months - Complete Workout Schedule
To reach a planche in 6 months, you need a solid training plan. We've created a detailed workout schedule. It includes weekly plans, strategies for getting stronger, and rest weeks for recovery.
Weekly Training Templates
A good weekly plan is key for steady progress. Your plan should mix exercises for the planche, strength training, and conditioning.
- Monday: Planche-specific strength training (e.g., planche leans, pseudo planche push-ups)
- Tuesday: Upper body strength training (e.g., push-ups, dips)
- Wednesday: Conditioning and core strength (e.g., hollow body holds, Russian twists)
- Thursday: Lower body strength training (e.g., squats, lunges)
- Friday: Planche-specific strength training
- Saturday: Active recovery (e.g., light yoga, walking)
- Sunday: Rest
Progressive Overload Strategies
Getting stronger means using progressive overload. You can do this by doing more reps, sets, or harder exercises over time.
| Month | Progressive Overload Strategy |
|---|---|
| Month 1 | Increase push-up repetitions by 5 each week |
| Month 2 | Introduce planche leans and increase hold time by 5 seconds weekly |
| Month 3 | Progress to pseudo planche push-ups and increase by 3 repetitions weekly |
Deload Weeks and Recovery Planning
It's important to have deload weeks and plan for recovery. This helps avoid burnout and injuries. Deload weeks should happen every 4-6 weeks, with less intense and less frequent training.
Deload Week Strategy:
- Reduce training frequency by 30%
- Decrease intensity by lowering the difficulty of exercises
- Focus on active recovery techniques such as stretching and foam rolling
By sticking to this workout plan, you'll be on your way to mastering the planche in 6 months. Stay consistent, listen to your body, and adjust the plan as needed.
Nutrition to Support Your Planche Journey
To support your planche journey, it's key to know the nutritional needs. Proper nutrition is vital for any training plan. It gives your body the strength, recovery, and performance it needs.
Caloric Requirements for Strength Building
To build strength for planche training, you need to eat more calories than you burn. This is called a caloric surplus. It helps your muscles grow and repair. The exact amount of calories you need depends on your age, weight, and how active you are.
A good diet should have proteins, carbs, and fats. Carbohydrates are key for energy during workouts. Make sure to eat complex carbs like whole grains, fruits, and veggies.
Protein Needs for Muscle Development
Protein is vital for muscle growth and repair. If you're doing resistance training like planche exercises, you need more protein. Aim for 1.6-2.2 grams of protein per kilogram of body weight every day. This helps your muscles recover and grow.
Good protein sources include lean meats, fish, eggs, dairy, and plant-based options like legumes and tofu. Eating protein within an hour after working out helps with recovery.
Key Nutrients for Tendon and Joint Health
Keeping your tendons and joints healthy is important for planche training. Certain nutrients can help:
- Omega-3 fatty acids in fish oil and flaxseeds reduce inflammation.
- Vitamin C in citrus fruits and berries helps with collagen.
- Glucosamine and chondroitin supplements support joint health by keeping cartilage strong.
Adding these nutrients to your diet can help prevent injuries and support your training.
Recovery Protocols for Intensive Training
To master the planche in six months, you need to know about recovery. Recovery is as key as training. It lets your body fix and get stronger between hard workouts.
Sleep Optimization Techniques
Sleep is key for recovery. It helps your body fix muscles, remember things, and balance hormones. Getting good sleep is essential for recovery.
- Keep a regular sleep schedule to keep your body clock in sync.
- Make your bedroom dark, quiet, and cool for better sleep.
- Stay away from caffeine and screens before bed for better sleep.
Active Recovery Methods
Active recovery means doing light activities to help your body. It boosts blood flow and gets rid of waste without too much strain.
"Recovery is a key part of training. You can't just train hard and expect results. You need to recover, rebuild, and come back stronger."
- Do light cardio like walking or jogging.
- Try yoga or stretching to improve flexibility and reduce muscle tension.
- Use foam rolling or self-myofascial release to help with muscle recovery.
Stress Management for Optimal Gains
Too much stress can hurt your recovery and training. Using stress management can help.
| Stress Management Technique | Description | Benefits |
|---|---|---|
| Meditation | Practice mindfulness meditation to calm your mind. | Reduces stress, improves focus |
| Deep Breathing Exercises | Do deep, controlled breathing to relax. | Lowers cortisol levels, promotes relaxation |
| Progressive Muscle Relaxation | Tense and relax different muscle groups. | Reduces muscle tension, promotes relaxation |
Adding these recovery methods to your training can help you reach your goal of mastering the planche in six months.
Preventing and Managing Common Injuries
Getting good at planche takes hard work and knowing how to avoid injuries. You're not just getting stronger; you're also facing the risk of getting hurt.
Wrist Care and Maintenance
Wrist health is key when doing planche. Here's how to keep your wrists safe:
- Do wrist exercises to keep them flexible.
- Work on wrist strength with specific exercises.
- Make sure to use the right form in planche holds.
Shoulder Injury Prevention
Shoulders are often hurt in calisthenics because they bear a lot of weight. Here's how to avoid shoulder injuries:
- Do exercises to improve your shoulder's range of motion.
- Build muscle around your shoulder with targeted workouts.
- Always use the right form to avoid shoulder strain.
Elbow Tendinitis Mitigation
Elbow tendinitis is a big problem for those who do calisthenics. Here's how to fight it:
- Slowly increase your workout intensity to avoid tendon stress.
- Do exercises that strengthen your forearm to support your elbow.
- Use good warm-ups and cool-downs to protect your tendons.
By taking steps to prevent and manage injuries, you can keep training without interruptions. This way, you can reach your calisthenics goals faster.
Troubleshooting Common Planche Problems

Troubleshooting is key in calisthenics, like mastering the planche. You might face several common issues that slow your progress.
Wrist Pain Solutions
Wrist pain is common in planche training. It can come from bad form, weak wrists, or not warming up enough.
- Make sure your wrists are straight and hands are firmly on the ground during planche holds.
- Do wrist curls and extensions to strengthen your wrists.
- Add wrist mobility exercises to your warm-up to improve flexibility.
Shoulder Positioning Issues
Getting your shoulders right is vital for planche form. Wrong positioning can cause strain and injury.
| Issue | Solution |
|---|---|
| Shoulders shrugged | Keep your scapula down and depressed. |
| Shoulders rolled forward | Squeeze your shoulder blades together to fix the position. |
Core Tension Difficulties
Keeping your core tight is key for stability in the planche. Weak core or bad technique can make it hard.
To improve core tension:
- Do exercises like planks and hollow body holds to strengthen your core.
- Try deep breathing to help engage your core muscles better.
Your Path Beyond the Planche
Reaching the planche is a big achievement in your calisthenics journey. It shows your strength, control, and dedication. Once you master the planche, you're not just stopping at a goal. You're starting a new chapter.
After mastering the planche, you can explore new skills and deepen your body control and strength. This journey is about pushing your limits and finding new challenges. It keeps you engaged and motivated.
Consider trying advanced calisthenic skills like the front lever, human flag, or one-arm pull-ups. Each skill requires different strengths and techniques. This keeps your training diverse and fun.
Your calisthenics journey is all about learning and getting better. By taking on new challenges and focusing on progress, your training stays rewarding and motivating.
